
At Factory Cleaning Equipment, LLC we hear this question all the time: “How do I make my floor scrubber dry the floor like it did when we first bought the machine?” The answer is simpler than you might think. Over time, wear, clogs, and minor misadjustments can reduce suction and leave streaks behind. But with basic maintenance, you can often fix it yourself and no special tools are required.
Your floor scrubber’s vacuum system works like a giant wet/dry vac: it relies on strong suction, a tight seal, and a sharp squeegee blade to pick up dirty water efficiently. Below, we’ll walk you through the most common issues and fixes. Always consult your machine’s manual for model-specific details and prioritize safety.
Remember, if you are leaving puddles or streaks of water behind, your floor will be dirty again when the floor dries. Ensuring properly working vacuum and squeegee systems in your floor scrubber is probably the most important thing you can do to provide a clean, safe floor while scrubbing.
The foundation of good drying is strong suction from the recovery (dirty water) tank. Weak suction means water isn’t being pulled up effectively, leading to wet floors behind your floor scrubber.
💡Pro Tip: If the suction feels weak or inconsistent, stop here and proceed to troubleshooting. Normal suction ensures 90%+ water recovery on smooth floors.
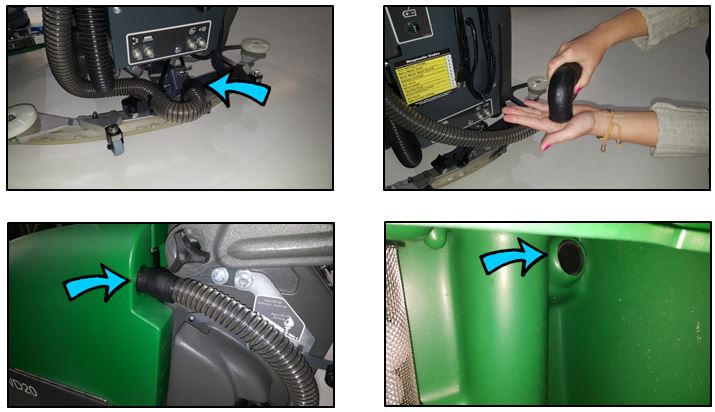
Debris buildup in the hose between the tank and squeegee is the #1 culprit of poor suction from the floor scrubber recovery.
Fix: Disconnect the hose and backflush it with a garden hose. Run water from both ends until clear. Reattach securely.
This points to a blockage at the tank inlet or a poor lid seal.
If suction is strong then the issue is likely at the squeegee. Move to step 2 below.
💡Pro Tip: When floor scrubber machine is not in use, always leave the recovery tank open. This allows the tank to dry out and the gasket to relax. Your tank seal will last much longer if you do this. You will also avoid growing a stinky science experiment in your dirty water tank!
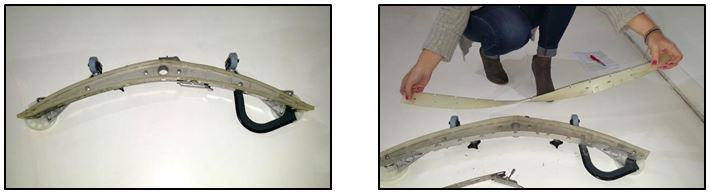
Even with great vacuum suction, a worn or dirty squeegee blade on the floor scrubber will smear water instead of wiping it up. Think of the squeegee as your “wiper blade” for the floor.
💡Pro Tip: When working on or around the machine, always move it to a safe place first. Set up traffic cones if necessary, and always remove the key from the ignition. From experience, I can tell you that someone can jump on the machine and turn it on faster than you can yell “Hey, I am back here working on the machine!”
💡Pro Tip: Rotate blades every 20 hours of use for even wear and longer life (up to 100+ hours total). Avoid gum rubber in oily environments, it absorbs grease and softens. Linatex and Urethane squeegees are typically more durable. Call us if you are unsure what to order.
A misaligned floor scrubber squeegee won’t contact the floor evenly, causing dry spots on one side and puddles on the other.
💡Pro Tip: Park on a flat surface, power off, and loosen lock nuts before adjusting if applicable. Retighten everything securely. Remember, most floors look very flat but are not. If you are struggling, move to a different area.
With a good seal, functioning motor, and sharp squeegee, you’ll get that “like-new” drying back fast. Still stuck? Give us a call at 800-793-3790. Our team at The Sweeper is here to help troubleshoot over the phone or arrange parts/service.
Have questions or need parts? Visit www.thesweeper.com or drop us a line. Happy scrubbing!